Termination Project
Server
Building a server with Raspberry Pi 4B
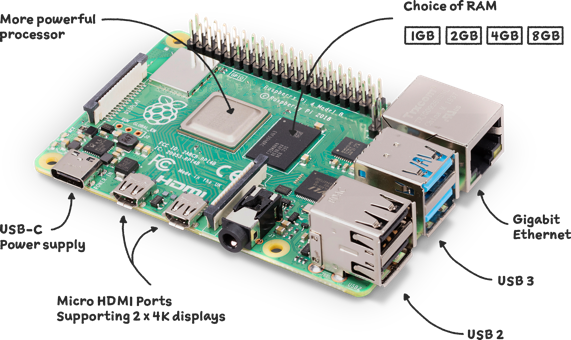
Hardware Preparation:
Essential items:
Raspberry Pi 4 8GB Model B with 1.5GHz 64-bit quad-core CPU (8GB RAM)1
At lesast 64GB SD Card (128GB is recommended for a small database server)
Any type of SD Card read that works for you
5V 3A Power Supply
Optional items:
Raspberry Pi 4B Protection/Radiator Case
Cooling fan fit for the case
Ethernet Cable
Mouse
Keyboard
Micro HDMI to Standard HDMI (A/M) Cable
Screen which supports the HDMI input
Writing A Raspberry Pi System On SD Card
Download Raspberry Pi Imager2
Put SD Card into the card reader and plug the reader into the PC
Run Raspberry Pi Imager
Choose an OS
Raspberry Pi OS(previously calledRaspbian) is the official supported operating system But I'd like to chooseUbuntu Server 20.04 LTSas my server OSMake sure that the SD card is in FAT32 format
Click "WRITE" button and wait until the proccess is done
Keep SD Card reader pluged in
Pre Configuration (Ubuntu Server 20.04 LTS)
WIFI: When WIFI is needed for you server at the begining Access your SD card, find the file called
network-configUse any text editor open that file Add your WIFI information as following:wifis: wlan0: dhcp4: true optional: true access-points: "Your WIFI SSID": password: "Your WIFI Password"Save the file and quit
Compact HDMI mode(when failed rendering occurs): Access your SD card, find the file calledusercfg.txtUse any text editor open that file Add following code to the file:disable_overscan=1 hdmi_force_hotplug=1 hdmi_drive=2 hdmi_group=2 hdmi_mode=18or using
hdmi_safemode3 More informations about the video settings can be found in video-options
Run The Server
Remove SD card reader from PC.
Take SD card from the reader and insert it into the Raspberry Pi 4B.
If you have a screen to use, power on yor screen first and connect it to the Raspberry Pi. (better do this step before turn on the Raspberry Pi).
Plug in the power supply.
If there is no switch or button on the power supply, Raspberry Pi should run automatically.
The default account and password of Ubuntu system is "ubuntu", login.
System will require you to change the password, change whatever you like.
Set up root password.
Make sure everything is updated by using
sudo apt update.
Configuration (Optional)
Since I built this server in China, I need to change the mirror by using:
cd /etc/apt
sudo cp -r sources.list ./sources.list.bak # Make a backup
sudo vim sources.list
I'd like to use the mirror from Tsinghua University site Change all http://ports.ubuntu.com/ubuntu-ports in the sources.list to https://mirrors.tuna.tsinghua.edu.cn/ubuntu-ports/ Then
sudo apt update
Everything is done. If you want to use Ubuntu Desktop in the future, do not re-install system, you can use one of the command below:
sudo apt install ubuntu-desktop
sudo apt install xubuntu-desktop
sudo apt install lubuntu-desktop
sudo apt install kubuntu-desktop
This is an example of how do you uninstill a desktop:
sudo apt autoremove kubuntu-desktop
MongoDB
Introduction
MongoDB is a NoSQL database based on distributed file storage. MongoDB has stable operation and high performance. It is designed to provide scalable high-performance data storage solutions for WEB applications 4.
Main Feature
Schema freedom Can store documents of different structures in the same database.
Collection-oriented storage A form suitable for storing JSON-style files.
Full indexing support Indexable on any property.
Replication and high availability Support data replication between servers, support master-slave mode and mutual replication between servers. The main purpose of replication is to provide redundancy and automatic failover.
Automatic sharding Supports cloud-level scalability: Automatic sharding supports horizontal database clusters with the ability to dynamically add additional machines.
Rich query functions supports rich query expressions, query commands use JSON format tags, and can easily query embedded objects and arrays in documents.
Fast in-place updates The query optimizer analyzes the query expression and generates an efficient query plan.
Efficient traditional storage Supports binary data and large objects (such as photos or pictures).
Install MongoDB Community Edition on Ubuntu
We are using
MongoDB 5.0 Community Editionon the server.
The OS is Ubuntu 20.04 LTS.
MongoDB 5.0 Community & Enterprise Edition supports bothx86_64architecture andARM64architecture for Ubuntu 20.04 LTS5.
Since Raspberry Pi is a relatively low-powered machine, I suggest you don't want to run a production, web-scale database on a Raspberry Pi.
The instructions below with the version 5.0 is not working on Raspberry Pi.
If you want to run MongoDB on Raspberry Pi, please follow the artical "Install & Configure MongoDB on the Raspberry Pi" instead, or compile the source code on the Raspberry Pi machine then install it manually.
Installation: To install unofficial version MongoDB, simply use:
sudo apt install mongodb
Using unofficial version is NOT recommended. Install the official mongodb-org package, which is maintained and supported by MongoDB Inc this time. If you have already installed the mongodb package on your Ubuntu system, you must first uninstall the mongodb package before proceeding. To fully uninstall the unofficial Ubuntu MongoDB, issue the following command:
sudo apt-get purge mongodb*
sudo rm -r /var/log/mongodb
sudo rm -r /var/lib/mongodb
Thw following steps are how to install MongoDB Community Edition by using the apt package manager.
Import the public key used by the package management system Issue following command from a terminal:
wget -qO - https://www.mongodb.org/static/pgp/server-5.0.asc | sudo apt-key add -After that, the operation should respond with an
OK.Create a list file for MongoDB Create the list file
/etc/apt/sources.list.d/mongodb-org-5.0.listWe are using Ubuntu 20.04 LTS, thendeb [ arch=amd64,arm64 ] https://repo.mongodb.org/apt/ubuntu focal/mongodb-org/5.0 multiverseshould be wirten in the list file. We can simply issue a line of command to finish the job:
echo "deb [ arch=amd64,arm64 ] https://repo.mongodb.org/apt/ubuntu focal/mongodb-org/5.0 multiverse" | sudo tee /etc/apt/sources.list.d/mongodb-org-5.0.listReload local package database
sudo apt-get updateInstall the MongoDB packages To install the latest stable version, issue the following:
sudo apt-get install -y mongodb-org
To install spcific version, see: Install the MongoDB packages
Run MongoDB Community Edition On Ubuntu
Directories
Since we are using package manager to install MongoDB on the server, the data directory/var/lib/mongodband the log directory/var/log/mongodbare created during the installation. We do not have to worry about creating those directory.Configuration File
The file/etc/mongod.confis the official configuration file. Settings inside the configuration file take effect upon startup, you have to restart the MongoDB to apply the changes. More configuraltion infomation can be found in Configuration File Options.Procedure
Follow these steps to run MongoDB Community Edition on your system. These instructions assume that you are using the officialmongodb-orgpackage -- not the unofficialmongodbpackage provided by Ubuntu -- and are using the default settings.Init System
We are using OS build in init system. In recent version of Ubuntu system, systemd (which uses thesystemctlcommand) is using for the init system.Start MongoDB
You can start the mongod process by issuing the following command:sudo systemctl start mongodVerify that MongoDB has started successfully
sudo systemctl status mongodStart with the system
If you need MongoDB start with your OS, issue follwoing command:sudo systemctl enable mongodStop MongoDN
If you need to stop MongoDB for some reason, issue follwoing command:sudo systemctl stop mongodRestart MongoDB
You can restart MongoDB by issuing the following command:sudo systemctl restart mongod
You can find errors and other important messages by watching /var/log/mongodb/mongod.log file.
Uninstall MongoDB Community Edition
For some reason, you may want to uninstall MongoDB. To completely remove MongoDB from a system, you must remove the MongoDB applications themselves, the configuration files, and any directories containing data and logs.
Stop MongoDB
sudo service mongod stopRemove Packages
sudo apt-get purge mongodb-org*Remove Data Directories
sudo rm -r /var/log/mongodb
sudo rm -r /var/lib/mongodb
Begin using MongoDB
After successfully start the mongod process, you can start a mongosh session on the same host machine as the mongod. You can run mongosh without any command-line options to connect to a mongod that is running on your localhost with default port 27017. The MongoDB Shell, mongosh, is a fully functional JavaScript and Node.js 14.x REPL environment for interacting with MongoDB deployments. You can use the MongoDB Shell to test queries and operations directly with your database.6 You can use mongosh to manipulate your MongoDB.
Optional
To create and manage users, see Use SCRAM to Authenticate Clients.
JAVA Project
JAVA
Install JAVA On Ubuntu
Install JAVA on Ubuntu system is a super easy job. To install the OpenJDK JRE, we run:
sudo apt install default-jre
To install the OpenJDK JDK, we run:
sudo apt install default-jdk
If you want to install a spcific version of JAVA, for example JAVA 11, we run:
openjdk-11-jre
openjdk-11-jdk
We can check if OpenJDK JRE or JDK was properly installed by running:
java -version
After you see something like:
openjdk version "11.0.13" 2021-10-19
OpenJDK Runtime Environment (build 11.0.13+8-Ubuntu-0ubuntu1.20.04)
OpenJDK 64-Bit Server VM (build 11.0.13+8-Ubuntu-0ubuntu1.20.04, mixed mode, sharing)
You can assume that you install that version of JAVA JRE successfully. Also we can check if OpenJDK Compile Tool was properly installed by running:
javac -version
The result should be somthing like:
javac 11.0.13
That's all you need to do on Ubuntu system.
Install JAVA On Windows
We are using JAVA 11 JDK as an example. Go to Java SE Development Kit 11.0.14 download page. You need an Oracle account to Download the installer, if you do not have one, register one. Download x64 Installer. Run the .exe file and follow the instructions on the installer. By default, the installer will choose C:\Program Files\Java\jdk-{vsersion}\ as dirctory. If you install it to a different dirctory, please remenber the dirctory you choose. During installation, the following files are copied to the location mentioned:
"C:\Program Files\Common Files\Oracle\Java\javapath\java.exe"
"C:\Program Files\Common Files\Oracle\Java\javapath\javaw.exe"
"C:\Program Files\Common Files\Oracle\Java\javapath\javac.exe"
"C:\Program Files\Common Files\Oracle\Java\javapath\jshell.exe"
Also the environment variables were added to the Path duing the installation. Note that the recent installed version will always overlay the older installed one, no matter what the version is. If you install JAVA 17 at first then install JAVA 11 next, JAVA 11 will take place of JAVA 17, because the files above was overwrited by the installer. For developers, you may have different versions of JAVA installed on the system. If we need spcific version of JAVA, goto environment variables. Find Path in the system variables, modify the C:\Program Files\Common Files\Oracle\Java\javapath to the path of the spcific JAVA you need. For example: C:\Program Files\Java\jdk-17.0.2\bin. You are all set.
Gradle
Both Gradle and Maven are automated build tools for projects. Compiling source code is only one aspect of the whole process. It's important that you release your software into production to generate business value, so you run tests, build distributions, analyze code quality, and even provide different versions for different target environments, and then deploy. It is necessary to automate the whole process. Although maven is now an industry standard, Gradle is a rising star of the build tools. Many people know this tool from android studio. Gradle has abandoned Maven's cumbersome XML-based configuration. It is well known that XML's reading experience is relatively poor. Although it is easy to identified by the machine, it is a torture for the people who is reading it. Instead, Gradle adopts the configuration of the domain-specific language Groovy, which greatly simplifies the number of lines of build code. That's why I choose Gradle this time.
Install Gradle On Windows
I assume that we do all the programming job on Windows operating system. Gradle requires at least JAVA JDK 8 to work. Since JAVA 11 is my favorite version, I do not really care about it. There is no installer for gradle on Windows operating system, you have to install it manually.
Download the latest Gradle distribution The distribution ZIP file comes in two flavors:
Binary-only (bin)
Complete (all) with docs and sources
Choose what ever you like.
Unpack the distribution Create a new directory (like
C:\Gradle) with File Explorer. Use whatever file archiver to unzip all the contents out to the directory you just created.Configure your system environment In File Explorer right-click on the
This PC(orComputer) icon, then clickProperties→Advanced System Settings→Environmental Variables. UnderSystem VariablesselectPath, then clickEdit. Add an entry forC:\Gradle\gradle-7.4\bin. ClickOKto save.Verifying installation
Open a CMD or PowerShell to run gradle -v to run gradle and display the version. E.g.:
Welcome to Gradle 7.4!

Here are the highlights of this release:
 - Aggregated test and JaCoCo reports
 - Marking additional test source directories as tests in IntelliJ
 - Support for Adoptium JDKs in Java toolchains

For more details see https://docs.gradle.org/7.4/release-notes.html


------------------------------------------------------------
Gradle 7.4
------------------------------------------------------------

Build time:   2022-02-08 09:58:38 UTC
Revision:     f0d9291c04b90b59445041eaa75b2ee744162586

Kotlin:       1.5.31
Groovy:       3.0.9
Ant:          Apache Ant(TM) version 1.10.11 compiled on July 10 2021
JVM:          1.8.0_291 (Oracle Corporation 25.291-b10)
OS:           Windows 10 10.0 amd64
NOTE: Gradle needs environment variable JAVA_HOME and its value set to a valid directory then add %JAVA_HOME%\bin to environment variable Path. I did not mention this in JAVA installation part. In the example above, I did not set JAVA_HOME to the path of JAVA 11 instead of JAVA 1.8. The JVM then shows JAVA 1.8.0_291 (Oracle Corporation 25.291-b10) is being used.
Choose A JAVA IDE
Gone are the days when you could only write programming with a text editor. Today is the era of IDEs (Integrated Development Environments), where various developer tools for building applications are often consolidated into separate GUIs. An IDE usually includes a source code editor, debugger, and various build automation tools. They enable navigation between code, facilitate code completion, and provide support for refactoring. To write, debug, and test code smoothly and easily, developers often choose the IDE that best fits the project at hand. Among them, the most commonly used is the Java IDE. In general, Java IDE has the following advantages:
Automatically validate syntax
Support syntax coloring (syntax coloring)
Provide ready-made code templates
Support code refactoring
Provides a powerful debugger and Java editor
Allow setting breakpoints
There are several IDEs I recommended to use:
IntelliJ IDEA
BlueJ
Eclipse
NetBeans
VSCode
Codenvy
MyEclipse
Xcode (For Mac OS users)
jGRASP
JCreator
JDeveloper
In this project, I will use lntelliJ IDEA Community Edition as my IDE. lntelliJ IDEA Community Edition has a great gradle support, it will save me a lot of time on testing and debuging.
Spring Boot

Introduction of Spring Boot
Spring Boot is a new framework provided by the Pivotal team, designed to simplify the initial setup and development of new Spring applications. The framework uses a specific way to configure, so that developers no longer need to define boilerplate configuration. In this way, Spring Boot aims to be a leader in the booming field of rapid application development. More details about Spring Boot see link Spring Boot.
Generate Project Template
In order to facilitate us to initialize the project, Spring Boot provides us a project template generating website. Spring lnitializr is where you can generate the project templeate. You can also use the unofficial Spring lnitializr plugin in the IntelliJ IDEA, which is pretty convenient. Spring lnitializr: 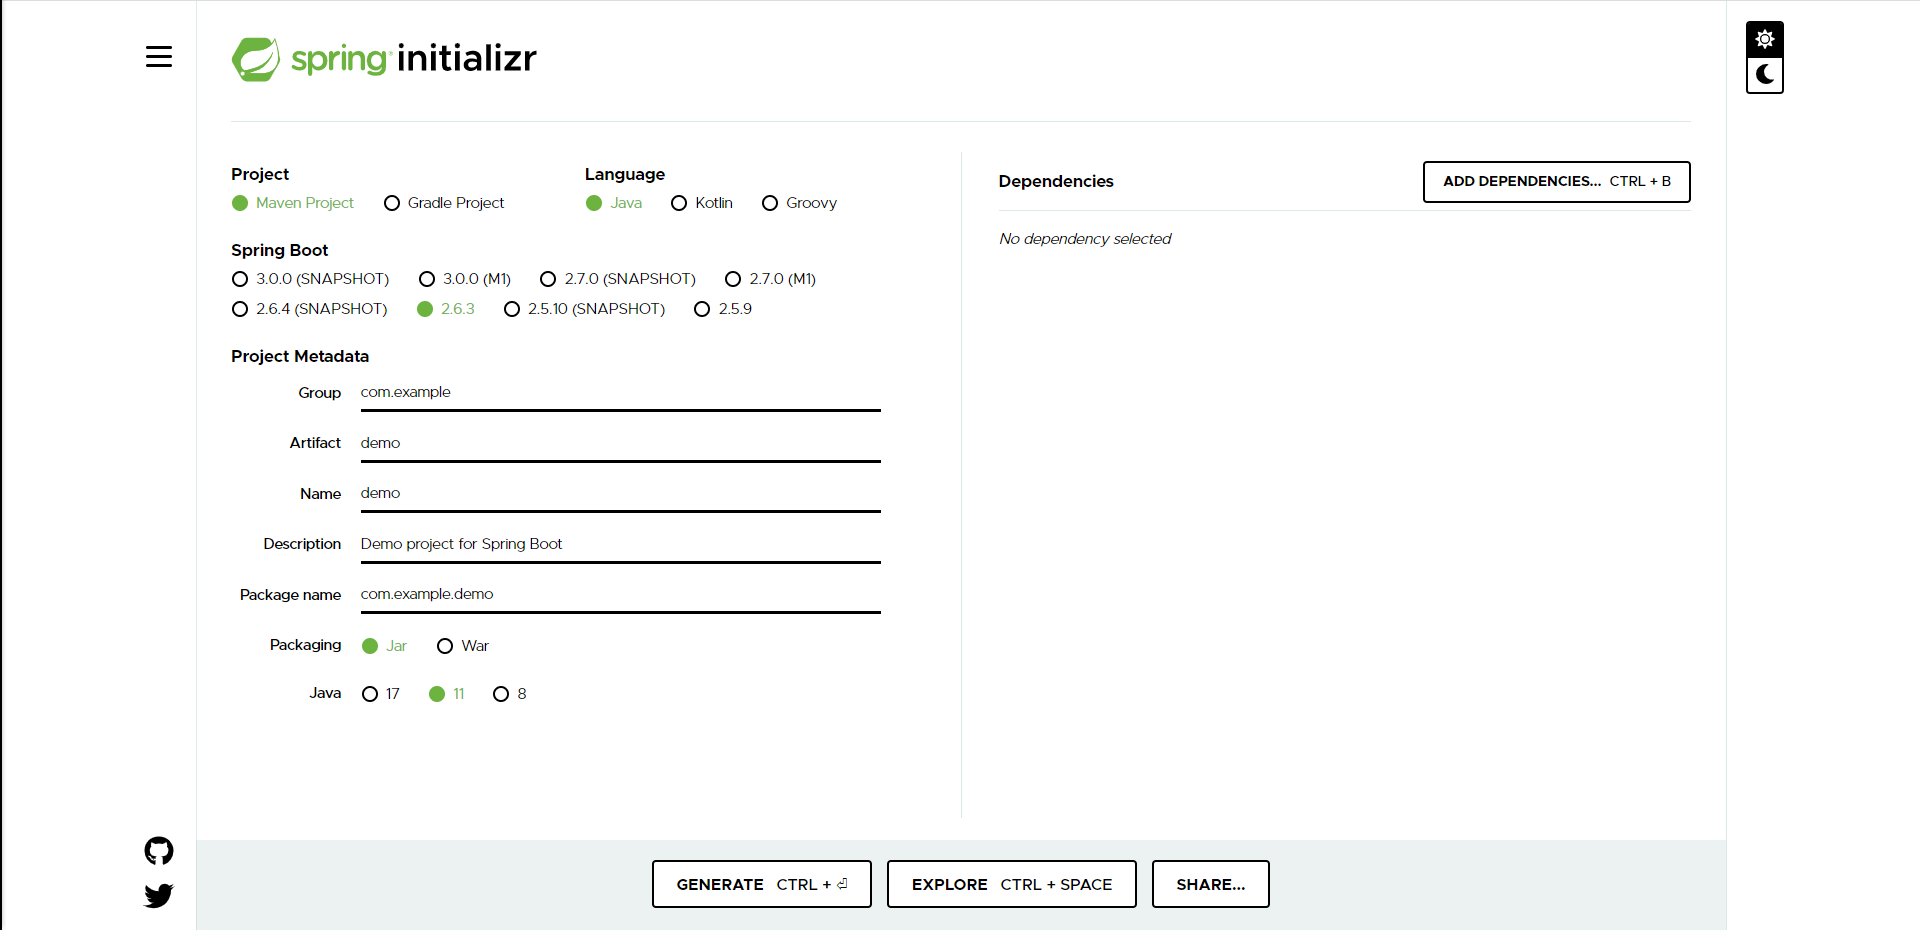
Dillinger
Markdown editor, beautiful and powerful, supports .md, .html, and .pdf file export. It also supports Dropbox, Github, Google Drive, and Onedrive one-click save. More inofrmation see Dillinger.io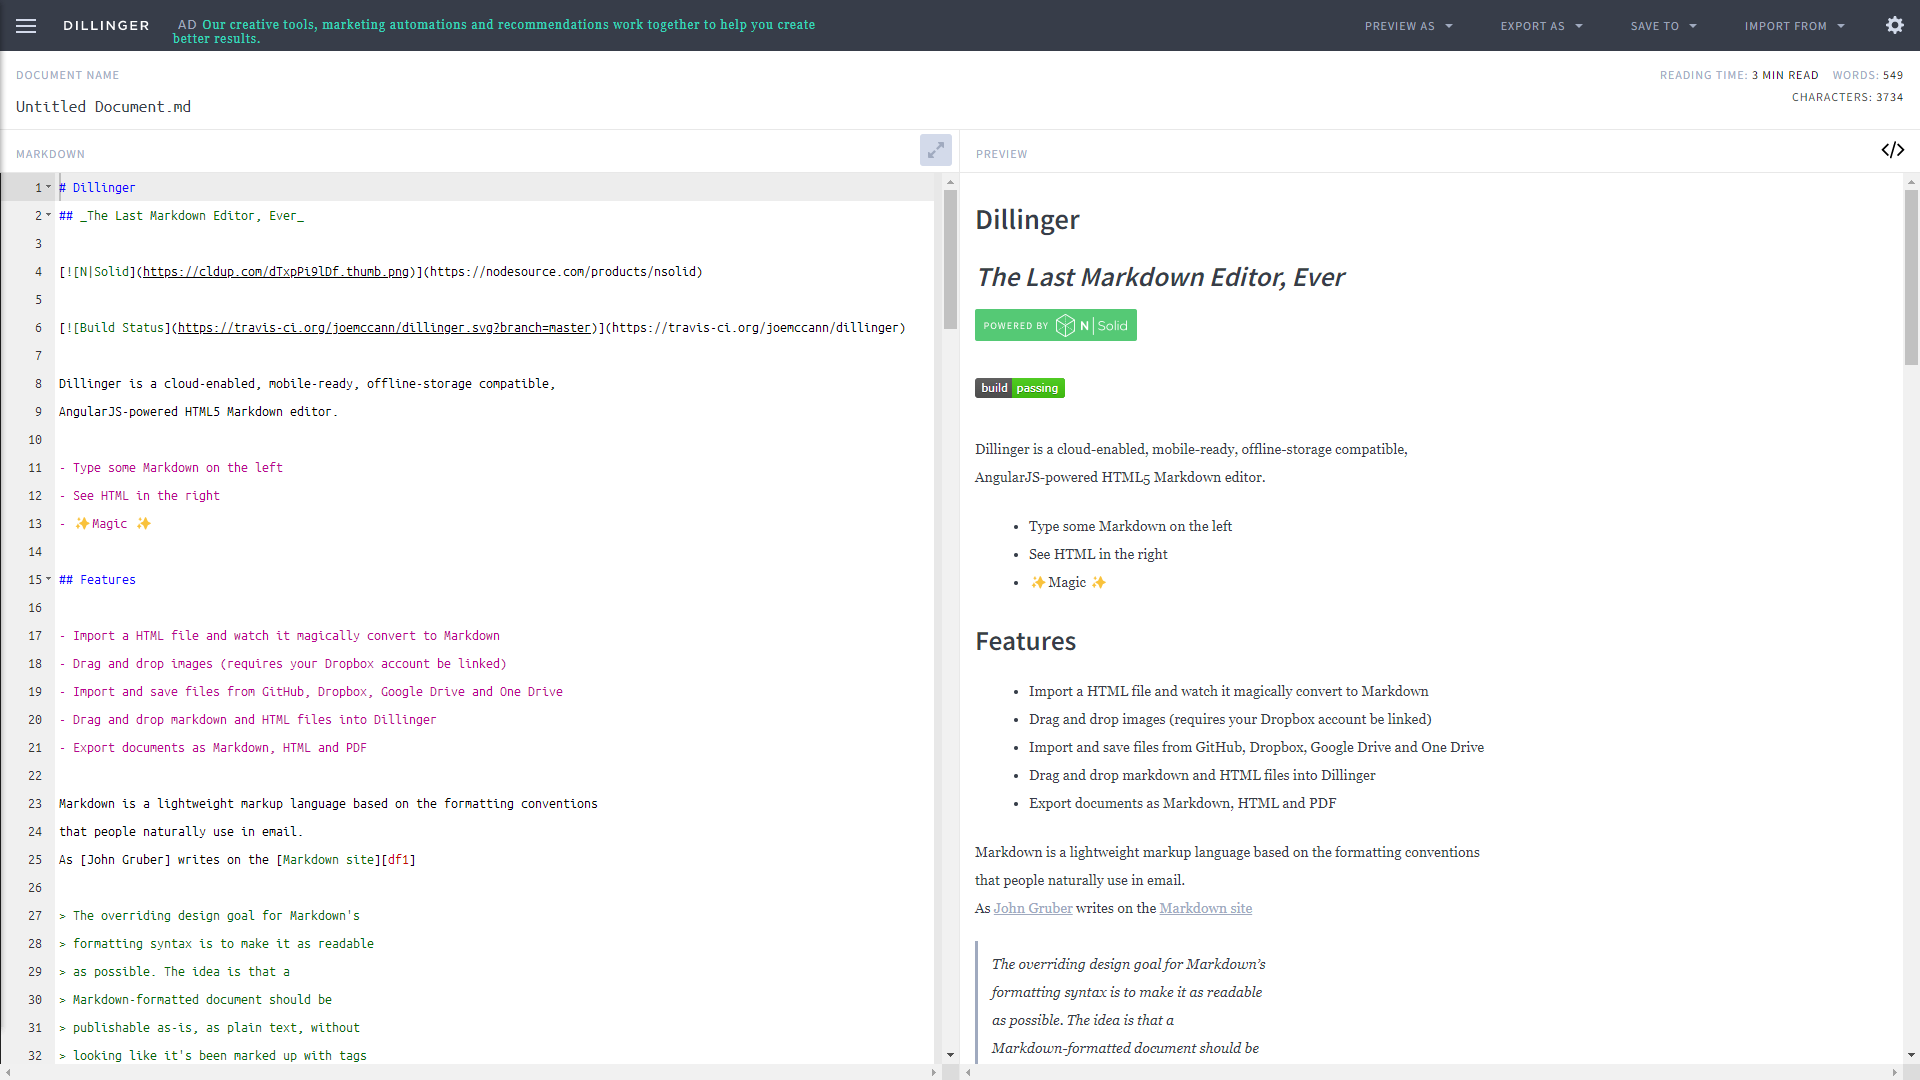
Postman

Introduction of Postman
Postman is a commonly used interface testing tool. Compared with other interface testing tools, such as Jmeter, RESTClient, loadrunner, SoapUI, etc., it is a relatively simple interface testing tool. Official website: https://www.getpostman.com Who is Postman suitable for? Available to both developers and testers:
Developer: After developing the interface of each function, you need to debug it yourself
Tester: Test whether the interface is implemented correctly by setting different parameters
The relationship between client, server and interface: Interface testing is to send requests to the server by simulating the client. And postman can simulate most HTTP requests and send requests to the server. Front-end: Also known as client/front-end, that is, the end that users use, such as mobile phone and web. Backend: Also known as server/backend, it mainly processes the client's request (input). After the server processes the request, it will return the processing result (output) to the client, so that it can be displayed on the page. Interface: When the front end sends a request to the server, it calls the interface of the corresponding function in the server, such as login interface, registration interface, forget password interface, etc. What does Postman looks like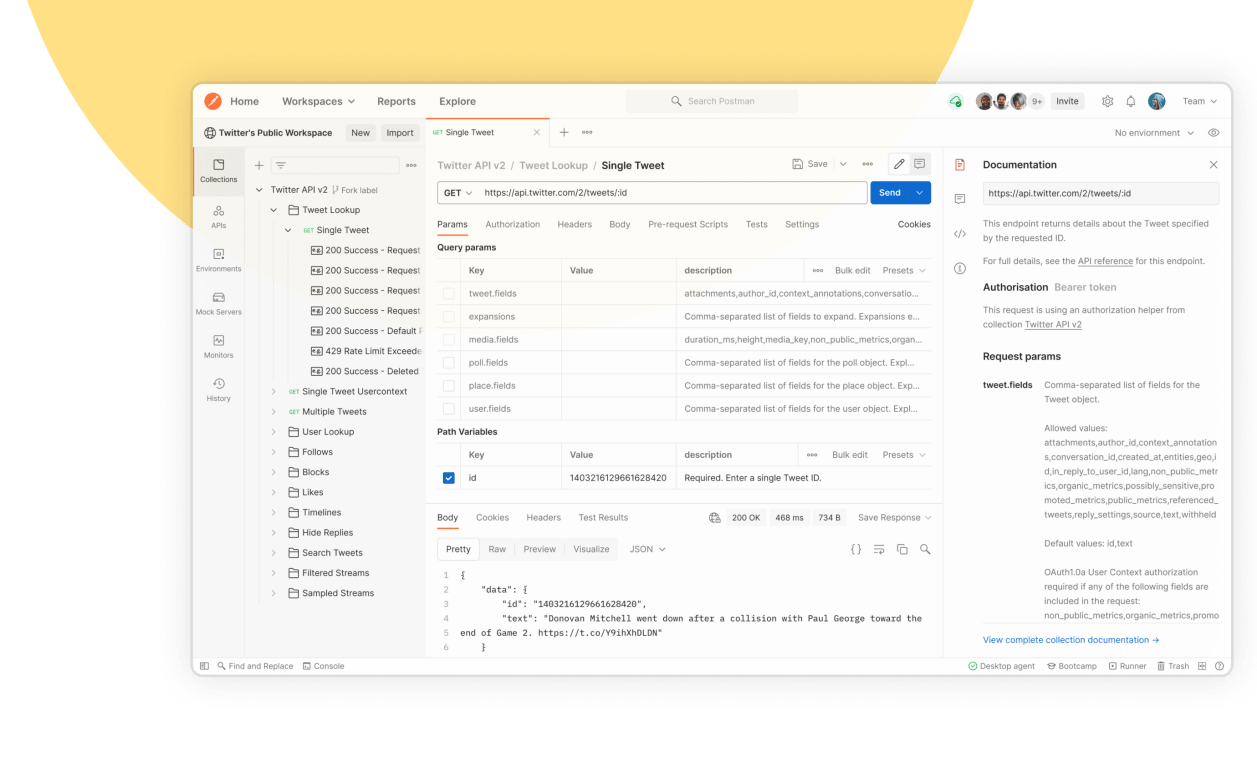 What do I use in my project
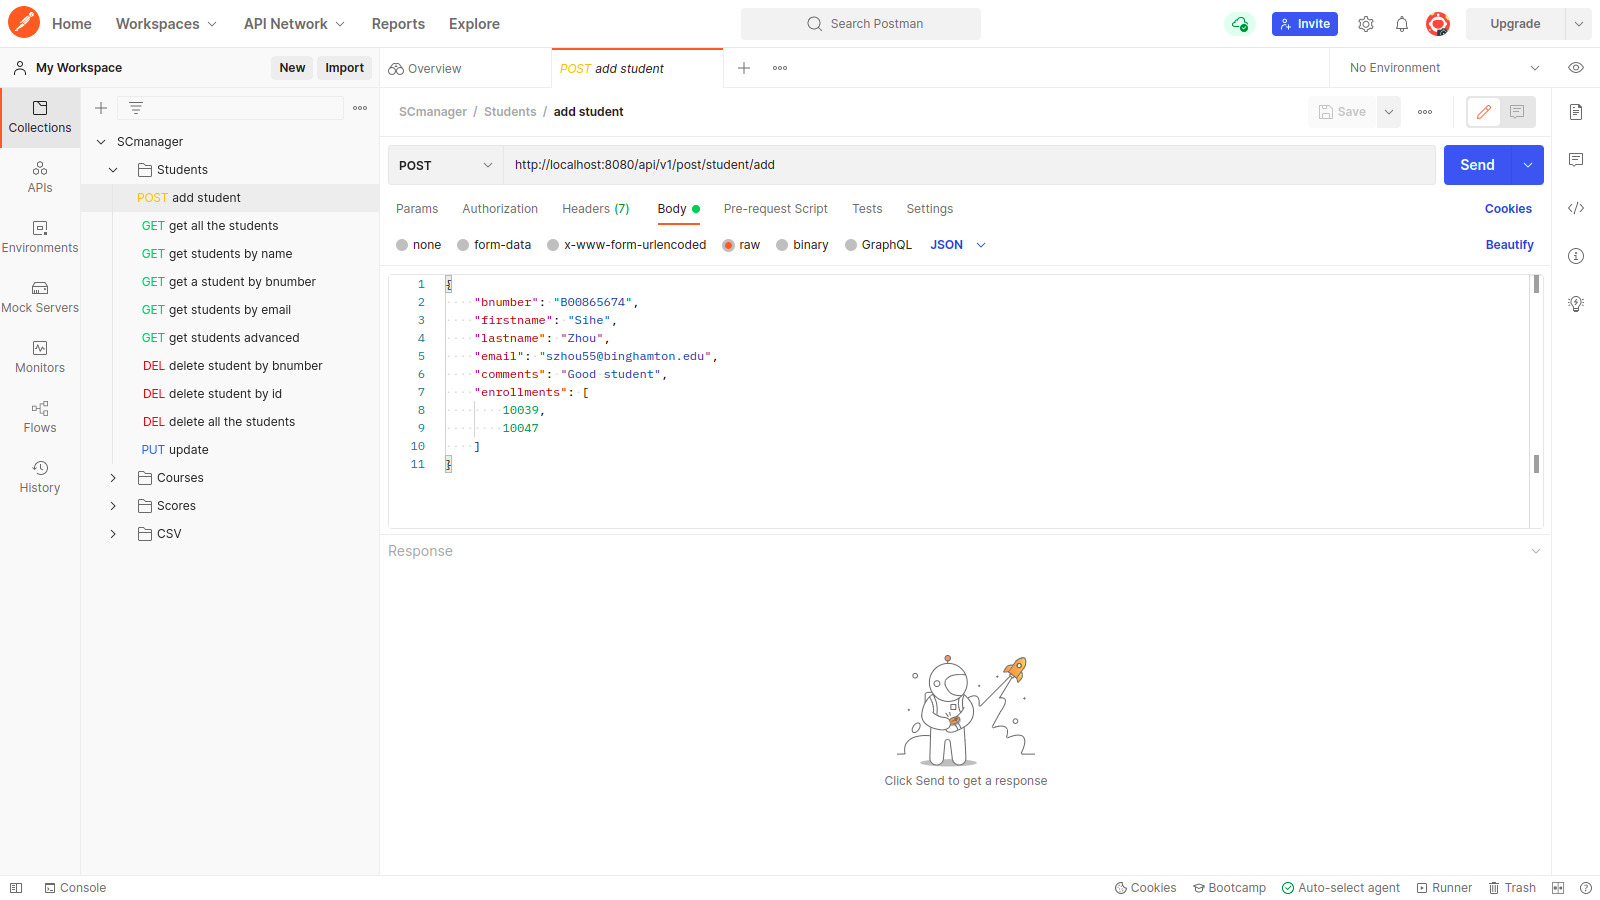
Programming Project
Introductions
My programming is about Student-Course-Score manager. Users can manage studnets, courses, and scores easily by using various APIs provided in this back-end JAVA program. This project using Spring Boot + Gradle + IDEA tecnonlogy, makes this project easy to test.
Settings
Under src/main/resources there is a application.yml file.
# Open debug mode or not
debug: false

server:
    # Which port you want this pragram use
    port: 8080

spring:
    data:
        mongodb:
            # MongoDB host address
            host: "localhost"
            # MongoDB port
            port: 27017
            # Database name
            database: "University_Sys"
            # Database user name
            username: "user"
            # Database user password
            password: "password"
    output:
        ansi:
            # Enable color output
            enabled: "always"

app-settings:
    # This is where the input temp file goes.
    input-folder: "csvfiles/"
    # This is where the output temp file goes.
    output-folder: "csvfiles/"
Banner
The developers of Spring know our programmers too well. So, when Spring was first designed, it gave us an interface to customize this banner diagram, so today we can customize a banner diagram ourselves. The class that Spring Boot starts to print the default logo is the SpringApplicationBannerPrinter class. The default order for SpringBoot to find the Banner is:
First, find the files
banner.gif,banner.jpgandbanner.pngin the Classpath in turn, and use the one found first.If the above file is not found, continue to look for
banner.txtin Classpath.If none of the above is found, use the default SpringBootBanner, which is the Spring Boot logo output above.
Generally, the banner.txt file is placed in the src/main/resources/ directory. Now that we have found the key problem, we can create a banner.txt file by ourselves, let him overwrite SpringBoot's default logo, and implement our custom logo. You can use Text to ASCII Art Generator generate a .txt banner content. This is my banner: 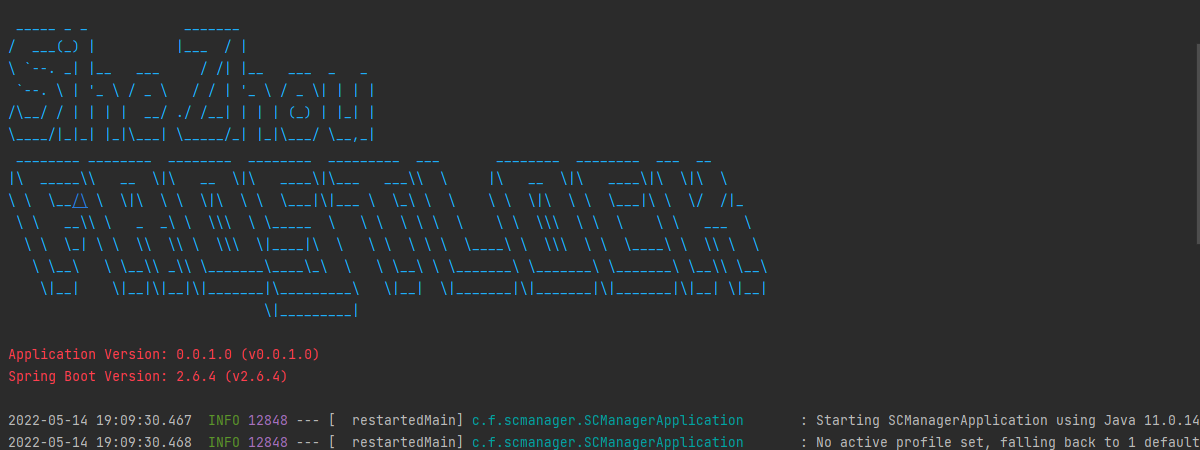
Main functions:
Students
[Post] Add a student
[Get] Get all students
[Get] Get students by name
[Get] Get a student by BNumber
[Get] Get students by email
[Get] Advance student searching
[Post] Update a student info
[Delete] Delete a student by BNumber
[Delete] Delete a student by database ID
[Delete] Delete all the students
Course
[Post] Add a course
[Get] Get all courses
[Get] Get a course by CRN
[Get] Get courses by subject
[Get] Get courses by title
[Get] Advance courses searching
[Post] Update a course info
[Delete] Delete a course by CRN
[Delete] Delete a course by database ID
[Delete] Delete all the courses
Score
[Post] Add a score
[Get] Get all scores
[Get] Get a scores by BNumber
[Get] Get scores by date
[Get] Get courses by date between a range
[Post] Update a score info
[Delete] Delete a score by database ID
[Delete] Delete all the scores
SCV Inport Export
[Get] Download all
[Get] Download courses
[Get] Download students
[Get] Download scores
[Post] Upload all
[Post] Upload courses
[Post] Upload students
[Post] Upload scores
Test
To test this project, simply run bootRun in the IDEA gradle controll panel.
Build
To build and package this project, run bootJar in te IDEA gradle controll panel. The executable .jar file will generate under build/libs/ folder.
Run
java -jar scmanager-0.0.1-SNAPSHOT.jar
Useful dependencies
OpenCSV Opencsv is an easy-to-use CSV (comma-separated values) parser library for Java. It was developed because all the CSV parsers at the time didn’t have commercial-friendly licenses. Java 8 is currently the minimum supported version.
